This article considers that the readers are aware of .NET
assemblies and the CLR internals. If you have any questions on this, you can
consider reading following articles by Microsoft:
In this article we are going to straight away discuss the creation
and sharing by a simple example.
Create solution file using visual studio 2008 and add a
class library project.
I named my project as “TestGACRegistration” and the class as
“TestDLL”.
using System;
using System.Collections.Generic;
using System.Linq;
using System.Text;
namespace TestGACRegistration
{
public class TestDLL
{
public string mymethod()
{
return
"M1";
}
}
}
Now build the class library project.
Add a new console project to the same solution and add the
project reference to the “TestGACRegistration” project and you should find the
dll available in the references section of the console application project.
using System;
using System.Collections.Generic;
using System.Linq;
using System.Text;
namespace MyConsoleApp
{
class Program
{
static void Main(string[]
args)
{
TestGACRegistration.TestDLL testdll=new
TestGACRegistration.TestDLL();
Console.WriteLine(testdll.mymethod());
Console.ReadLine();
}
}
}
Now run the console application to see the output:
You see the output returned was M1 and that is correct.
Normally there are many ways of how developers maintains the
references to the DLLs in the development environment.
1.
Building the DLLs to a specific path and share
all the DLLs from the path instead of referring to the class library projects.
2.
Adding references directly to the DLLs generated
in the bin/release folders of each application.
First option should be used when
the DLL is being referenced by multiple projects and we do not want to
duplicate the DLLs to be deployed for each project as private. Second one is
good when we are having all the DLLs built for one project.
Another way to look at is imagine
we have another console application in the solution which points to another all
the DLLs in the project. Let us call the console application as “MyConsoleApp2”
and the other class library as “AnotherLibrary”. Now, the second console
project is referring both the DLLs in the solution and they have been
referenced using the second option.
While I was working in the
project, I have configured the solution file configuration section to build all
the class library projects both in debug and release mode. I have compiled the
application both in debug and release mode and the DLLs are built for both the
modes in the respective bin/release folders of each application library and the
same have been copied in the console application bin/release folders as they
referring to these projects.

Now one of the developer thinks that every time he changes
the console application 1, it is building the DLL for the second class library
too which is not required for the console application 1 and so he goes into the
configuration settings of the solution file and he unchecks the build option
for the class library 2 for both debug and release modes. While building set up
projects for deployment, I simply select the output folders of the projects and
I rebuild the solution in release mode without knowing that someone has changed
the configuration properties of the solution.
After deploying to another environment, you may find that
new changes are not elevated as the new DLLs are not built in the release mode.
Unless, if you select output window while building and checking if all the
projects are getting compiled.
So, in order to avoid this we will not allow each project to
reference the class library project for the DLL but refer to the location where
DLLs are copied. This ensures that always the project is referring to the
correct DLL compiled.
When we have more references to the same DLL by multiple
projects or applications, the DLLs should be in shared mode rather than getting
copied to each application’s folder as private assembly. The reason being if we
compile the DLL with a small change, we need to deploy all the applications
referring to it. Microsoft concept of deployment of shared assemblies in .NET
helps in resolving this issue by first registering the DLL in the GAC and all
the applications should be referring to the DLL available in the GAC. Also we
do not want these DLLs to be copied into the application bin/release folder. To
do this, we need to set one property “Copy Local” of the DLL after referencing
it.

This ensures that the DLL is not copied to local path of the
application whenever you build the project.
If there is only one application that is referencing a DLL and
only one or two developers are working in a project and they communicate the
changes to each other, then the second option works fine.
You can test the same first without setting the property “Copy
Local” to false and then setting it to false.
With setting “True”:

With setting as false:

Again the practices differ from team to team and project to
project and so there are no defined practices to be followed. It should always
to be considered based on what is best for the team.
To deploy the shared DLLs into the GAC, we need to generate
a strong name first using sn.exe. More information on this can be found from
Microsoft MSDN:
Now we need to generate the strong name in our example for
the class library “TestGACRegistration” in order to deploy it to GAC.
Go to Microsoft Visual studio command prompt and run the
strong name key utility as below:

The key should be specified in the AssemblyInfo.cs of the
class library. It will be available in the properties folder of the Class
library project. Normally, the key would be copied into the organization’s
secured folder path and will be referenced.
Add the key attribute as below:
[assembly: AssemblyTitle("TestGACRegistration")]
[assembly: AssemblyKeyFile(@"C:\MySN.snk")]
[assembly: AssemblyDescription("")]
[assembly: AssemblyConfiguration("")]
[assembly: AssemblyCompany("Microsoft")]
[assembly: AssemblyProduct("TestGACRegistration")]
[assembly: AssemblyCopyright("Copyright © Microsoft 2012")]
[assembly: AssemblyTrademark("")]
[assembly: AssemblyCulture("")]
If you forget to add the key file attribute you would get an
error during deployment.
Deployment:
Now, after the coding is completed how can I deploy the
shared DLLs in the GAC of the production server? The answer is we can do in two
ways:
-
Using tool for registering the DLL in the GAC
i.e., GACUTIL.exe
-
Using a Microsoft setup project
We use the set up project option since we can add all the
required DLLs at one shot and we can build and run the MSI file. MSI file takes
care of deploying the DLLs into GAC without GACUTIL.exe as it is intelligent to
sense based on where the files are to be copied.
Add a new set up project to the solution and name it as “SetupDLLs”.

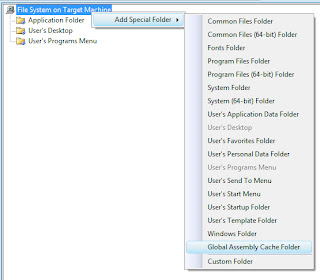
After project is created then right click on the project and
click ViewàFile
System and you see 3 project folders already present and so add another folder
by right clicking on the “File System On Target Machine” and select “Add
Special Folder” and select “Global Assembly Cache” folder. By default, any
files that are copied to the “Global Assembly Cache Folder” will be deployed
automatically by the set up project.

Now add the DLLs to be deployed to this special folder. In our
case we add only one.
Now build the set up project. Let us see what happens if the
strong name key was not added to the assembly. Just for testing purpose, I
remove the key attribute in the “AssemblyInfo.cs” file and try to build the set
up project again.

You would see an error if a shared assembly do not have a
strong name specified. Now, revert back the change and run the setup project
again.
You would see the following content in the output window
now:
------
Pre-build validation for project 'SetupDLLs' completed ------
------
Build started: Project: SetupDLLs, Configuration: Debug ------
Building
file 'C:\TestGACRegistration\SetupDLLs\Debug\SetupDLLs.msi'...
Packaging
file 'TestGACRegistration.dll'...
========== Build: 1
succeeded or up-to-date, 0 failed, 0 skipped ==========
Now you would see two files got copied into bin/release
folder based on the mode you have built the setup project.

Now run the setup.exe and deploy the DLLs. You can manually
run the exe file or run from command prompt. We do it manually, but in case if
you would like to know the silence installation, refer to the following URL:
After the installation is successful, you can go and check
if the DLLs are successfully deployed in the GAC. Location of GAC is normally
C:\Winnt\assembly or c:\Windows\assembly.

You see now the DLL is successfully registered in GAC.
Now we can test if this works. One question to ask is: If I
change the class library code locally in my solution and build the DLL, do my
console application refers to the new DLL?
The answer is No. If you have a DLL registered in GAC with
the same version as you have in your local application, always the one in the
GAC is referenced. If you want to test the new code, you have to change the
version of the DLL in your local application by changing the version in “AssemblyInfo.cs”
class located in the property folder of the class library. I have compiled the
assembly with version as 1.1.0.0 and deployed in GAC for our example.
If you would like to test it, let us go and change the code
in the method as below:
using System;
using System.Collections.Generic;
using System.Linq;
using System.Text;
namespace TestGACRegistration
{
public class TestDLL
{
public string mymethod()
{
return
"M2";
}
}
}
Now my method should return “M2” instead of “M1” if the
console application is referencing the local DLL. Now build the class library
and run the console application to see the result.
Still you the see the output as “M1” only. If you want to
test it more thoroughly you can delete the class library reference and add it
to the console application project to test it and you see it always returns “M1”
only.
Now I will change the version and test it again.
// [assembly: AssemblyVersion("1.0.*")]
[assembly: AssemblyVersion("1.2.0.0")]
[assembly: AssemblyFileVersion("1.0.0.0")]
Now build the class library and add the reference to the new
DLL/project for clean testing. You would now see the value displayed as “M2”.
One drawback observed while using the setup project is you
cannot uninstall the assembly from the GAC directly unless you uninstall the
setup project instance in the computer. This helps in uninstalling the previous
version and install new one. If we make new changes to the DLL and these code
changes are made for only one of the application purpose, then we would like
the other applications with our new version deployment. If we want to do that,
we need to change the upgrade code of the set up project and can install
another version of the same DLL. We all know GAC supports side-by-side
execution of multiple DLLs having same name and different versions.
In a real time, you might find more flexibility in deploying
the shared DLLs using the set up project.
No comments:
Post a Comment