I have completed Professional Scrum Master I this December and here is what my experience about the preparation for the exam:
- Read the Scrum Guide from scrum.org. It is just 16 pages document that is available in multiple languages. Note that there is minor difference between Scrum Alliance and Scrum.org in some of the numbers. So, it is advised not to mix the both for your exam.
- It is advised that working in a Scrum team gives more insight than just reading about the Scrum.
- Once you feel comfortable about the Scrum literature, go for open assessments for PSM I in scrum.org.
- If you get 100% pass marks every time you attempt the open assessment then you are halfway in the battle as you may get some of the questions from these assessments.
- Even though the document does not speak about the Burn down chart you may get a question or two from that and so familiarize yourself with that.
- Follow the forums in the scrum.org by registering yourself.
If you are new to Scrum then it is better that you take a session on that. Otherwise, the training is not mandatory. Finally, get password and appear for the exam.
Wednesday, December 25, 2013
Monday, October 21, 2013
Use and Misuse of Design Patterns
In this article, Rockford Lhotka discusses about the use and misuse of Design Patterns. We often get enthused with the implementation of Design Patterns when we learn one. But, some of the technologists opine that using the design pattern without actual need indeed will result into negative consequences rather than positive consequences. Unless the positive consequences overweigh the negative consequences of using a particular pattern, do not use it. A simple programming construct is just enough. There is no hard-core rule that we need to implement Design Pattern in programming for sure.
I liked this article by Rockford and hope you would like this too…
http://www.lhotka.net/weblog/OnTheUseAndMisuseOfPatterns.aspx
Saturday, September 28, 2013
Remove a named instance in SQL Server 2008/2012
If you have two instances of SQL Server installed in your desktop and want to remove one of the instances then follow these steps:
1. Go to “Control Panel” and select “Add/Remove Programs” or “Uninstall Programs”.
2. Select “SQL Server Management Studio” in the installed products.
3. Do not get scared when you click “Remove” button it will not install all the instances. When it asks for the instance name to select from the list of instances, select the instance to be deleted.
4. Click “Next” till all the steps are completed.
Monday, August 12, 2013
The type of page you have requested is not served because it has been explicitly forbidden. The extension '.cshtml' may be incorrect. Please review the URL below and make sure that it is spelled correctly.
I have installed Web Matrix on my Laptop and tried to run a sample code by creating a new site and a new folder and added a cshtml file in it. But when I tried to browse the file, I got the above error.
This error went off when my root folder has a Default.cshtml file created.
Saturday, July 6, 2013
How to get installed programs in Windows 8
I often do experiments on my laptop with different software installations that might create challenges which would need me to re-install my Windows 8 software back. When I install Windows 8 often I find myself lost with the option to view the installed programs. So, I am writing this article for people like me who often forget how they could view the installed programs in Windows 8. I normally create a new tool bar and provide the path “C:\ProgramData\Microsoft\Windows\Start Menu” and select “Programs” folder and this gives me list of programs installed in my computer.
Monday, June 17, 2013
Asynchronous programming in ASP.NET 4.5
Two days back I was going through the Scott Hanselman’s video on ASP.NET 4.5 and thought to share the same with everyone. The sample program taken here is from his video and I just modified some parts to demonstrate it in a better way.
This example uses Visual studio 2012 and MVC 4 Web API and ASP.NET 4.5. Also in the example we are going to consume the Web API using WebClient class. WebClient class provides common methods for sending data and receiving data from a resource identified by URI.
In ASP.NET 4.5 Microsoft has added more methods and properties that support consuming resources using both synchronous and asynchronous manner. You can go through the WebClient supported methods and properties in MSDN http://msdn.microsoft.com/en-us/library/system.net.webclient(v=vs.110).aspx.
I have created a MVC Web API project with 3 different controller classes Contacts, Temperature and Location which will be consumed by the client application (ASP.NET 4.5 Web application). To do that I have created a blank ASP.NET MVC 4 Web application as below:

Figure 1: Create a MVC 4 project with name “WebAPITest”

Figure 2: Select Web API project

Figure 3: Create new controller by right-clicking the “Controllers” folder

Figure 4: Modifying the name of the Controller class and select the template as “Empty API Controller”.
Follow the above steps in creating Controller classes for Contacts, Location and Temperature. You can search for creating Web API for more information in the C# corner site www.c-sharpcorner.com. I would be just providing high level view on the Web API that will be used in this article.
Here are my Controller classes created for the article:
using System.Collections.Generic;
using System.Web.Http;
using WebAPITest.Models;
namespace WebAPITest.Controllers
{
public class ContactsController : ApiController
{
Contact[] contacts = new Contact[]
{
new Contact {Name="John", ContactNumber="444-978-0678"},
new Contact {Name="Mary", ContactNumber="424-968-8678"},
new Contact {Name="Raj", ContactNumber="449-968-9678"},
new Contact {Name="Ram", ContactNumber="440-938-8678"}
};
public IEnumerable<Contact> GetAllContacts()
{
System.Threading.Thread.Sleep(1000);
return contacts;
}
}
}
Observe that I have intentionally added Thread.Sleep in all the methods so that the thread consuming the API has to wait for some time. This would help us to understand the asynchronous programming.
Now you can test your web application by clicking CTRL+5 and you should see the home page immediately as below:

Figure 5: Home page
Now you can test your API by calling controller names as below:

Figure 6: Append “api/{Controller Name}”
You should see at the bottom of the browser a popup that gets the response in JSON format:

Figure 7: JSON response
Click on open and you should see the response in JSON format and this confirms that your program is correct.

Figure 8: Opening response in notepad
Similarly we can check for Location and Temperature APIs by appending api/Location, api/Temperature at the end of the home page URL.
Now create one more project of type web application and consume the APIs using WebClient class as below:
Default.aspx page:
Code behind:
In this client web application program we are trying to consume the 3 APIs synchronously using WebClient instance. To get the time taken to complete the response for 3 API calls we have recorded the start and end time of the total request/response. Then we bind the response data to the controls in the ASPX page.
Make sure that your Web API is running first and now start your web application and you should see the UI page as below.

Figure 9: Client UI page
You observe that the request started at 6/17/2013 10:15:09 and ended at 10:51:12 PM. So overall time it took is 3 seconds to complete the request. In a real time projects we may need to call multiple services for performing certain business logic functionality and if the request is more I/O specific or database specific then it would be time consuming task for waiting till all the requests are completed in order.
ASP.NET 4.5 came up with support for asynchronous execution of the same so that we can consume multiple resources at one time and thus saving the response time to the user.
To do this we need to perform some changes to the client application:
- Now make your page_load method to behave Async by adding “async” to the method.
Modify it to behave asynchronously by modifying the method DownloadStringTaskAsync(string address). DownloadStringTaskAsync downloads the resource as a String from the URI specified as an asynchronous operation using a task object.

- Next step is to add code to ask the program to wait till all the above tasks are completed. In .NET 4.5 there is a keyword introduced called “await” which instructs the executing thread to wait till some specific Task method is completed. Here is the total code:
- Immediately you would see red lines below the code for these 3 lines. This is because we are not executing the code synchronously and asking Task object to get back to us once the task is completed. So you cannot read the response directly instead you need now to specify .result to get the result of the task execution.

Modify the above code to as below:
Now we are done with the code changes for consuming the API asynchronously using the ASP.NET 4.5 feature. Now let us run the program again.

Figure 10: Details page
Now you can find that the total time taken is 1 second for all the requests as all the requests have been executed in asynchronous manner and the time taken is less compared to the synchronous way of consuming the Web API.
Here is the total code for the client application:
This example uses Visual studio 2012 and MVC 4 Web API and ASP.NET 4.5. Also in the example we are going to consume the Web API using WebClient class. WebClient class provides common methods for sending data and receiving data from a resource identified by URI.
In ASP.NET 4.5 Microsoft has added more methods and properties that support consuming resources using both synchronous and asynchronous manner. You can go through the WebClient supported methods and properties in MSDN http://msdn.microsoft.com/en-us/library/system.net.webclient(v=vs.110).aspx.
I have created a MVC Web API project with 3 different controller classes Contacts, Temperature and Location which will be consumed by the client application (ASP.NET 4.5 Web application). To do that I have created a blank ASP.NET MVC 4 Web application as below:

Figure 1: Create a MVC 4 project with name “WebAPITest”

Figure 2: Select Web API project

Figure 3: Create new controller by right-clicking the “Controllers” folder

Figure 4: Modifying the name of the Controller class and select the template as “Empty API Controller”.
Follow the above steps in creating Controller classes for Contacts, Location and Temperature. You can search for creating Web API for more information in the C# corner site www.c-sharpcorner.com. I would be just providing high level view on the Web API that will be used in this article.
Here are my Controller classes created for the article:
using System.Collections.Generic;
using System.Web.Http;
using WebAPITest.Models;
namespace WebAPITest.Controllers
{
public class ContactsController : ApiController
{
Contact[] contacts = new Contact[]
{
new Contact {Name="John", ContactNumber="444-978-0678"},
new Contact {Name="Mary", ContactNumber="424-968-8678"},
new Contact {Name="Raj", ContactNumber="449-968-9678"},
new Contact {Name="Ram", ContactNumber="440-938-8678"}
};
public IEnumerable<Contact> GetAllContacts()
{
System.Threading.Thread.Sleep(1000);
return contacts;
}
}
}
using System.Web.Http;
namespace WebAPITest.Controllers
{
public class LocationController : ApiController
{
public string GetCurrentLocation()
{
System.Threading.Thread.Sleep(1000);
return "San Jose, CA";
}
}
}
using System.Web.Http;
namespace WebAPITest.Controllers
{
public class TemperatureController : ApiController
{
public string GetCurrentTemperature()
{
System.Threading.Thread.Sleep(1000);
return "54F";
}
}
}
Observe that I have intentionally added Thread.Sleep in all the methods so that the thread consuming the API has to wait for some time. This would help us to understand the asynchronous programming.
Now you can test your web application by clicking CTRL+5 and you should see the home page immediately as below:

Figure 5: Home page
Now you can test your API by calling controller names as below:

Figure 6: Append “api/{Controller Name}”
You should see at the bottom of the browser a popup that gets the response in JSON format:
Figure 7: JSON response
Click on open and you should see the response in JSON format and this confirms that your program is correct.
Figure 8: Opening response in notepad
You will find that this has executed the method public IEnumerable<Contact> GetAllContacts()in the controller class and we got the List<Contacts> as a response in JSON format.
Similarly we can check for Location and Temperature APIs by appending api/Location, api/Temperature at the end of the home page URL.
Now create one more project of type web application and consume the APIs using WebClient class as below:
Default.aspx page:
<%@ Page Language="C#" AutoEventWireup="true" CodeBehind="Details.aspx.cs" Inherits="ClientApplication.Details" %>
<!DOCTYPE html>
<html xmlns="http://www.w3.org/1999/xhtml">
<head runat="server">
<title></title>
</head>
<body>
<form id="form1" runat="server">
<div>
Contacts:<br />
<asp:ListView ID ="listContacts" runat="server">
<LayoutTemplate>
<table runat="server" id="table1" >
<tr runat="server" id="itemPlaceholder" ></tr>
</table>
</LayoutTemplate>
<ItemTemplate>
<tr id="Tr1" runat="server">
<td id="Td1" runat="server">
<%-- Data-bound content. --%>
<asp:Label ID="NameLabel" runat="server"
Text='<%#Eval("Name") %>' />
</td>
</tr>
</ItemTemplate>
</asp:ListView><br />
Temperature:<br />
<asp:Label ID ="lbltemperature" runat="server"></asp:Label><br />
Location:<br />
<asp:Label ID="lblLocation" runat="server"></asp:Label><br />
Elapsed Time:<br />
<asp:Label ID="lblElapsed" runat="server"></asp:Label><br />
</div>
</form>
</body>
</html>
Code behind:
using System;
using System.Collections.Generic;
using System.Net;
namespace ClientApplication
{
public class Contact
{
public string Name { get; set; }
public string ContactNumber { get; set; }
}
public partial class Details : System.Web.UI.Page
{
protected void Page_Load(object sender, EventArgs e)
{
string time = DateTime.Now.ToString();
var clientcontacts = new WebClient().DownloadString("http://localhost:8687/api/Contacts");
var clientTemperature = new WebClient().DownloadString("http://localhost:8687/api/Temperature");
var clientLocation = new WebClient().DownloadString("http://localhost:8687/api/Location");
time = time + DateTime.Now.ToString();
var contacts = Newtonsoft.Json.JsonConvert.DeserializeObject<List<Contact>>(clientcontacts);
var temperature = Newtonsoft.Json.JsonConvert.DeserializeObject(clientTemperature);
var location = Newtonsoft.Json.JsonConvert.DeserializeObject(clientLocation);
listContacts.DataSource = contacts;
listContacts.DataBind();
lblLocation.Text = location.ToString();
lbltemperature.Text = temperature.ToString();
lblElapsed.Text = time;
}
}
}
In this client web application program we are trying to consume the 3 APIs synchronously using WebClient instance. To get the time taken to complete the response for 3 API calls we have recorded the start and end time of the total request/response. Then we bind the response data to the controls in the ASPX page.
Make sure that your Web API is running first and now start your web application and you should see the UI page as below.

Figure 9: Client UI page
You observe that the request started at 6/17/2013 10:15:09 and ended at 10:51:12 PM. So overall time it took is 3 seconds to complete the request. In a real time projects we may need to call multiple services for performing certain business logic functionality and if the request is more I/O specific or database specific then it would be time consuming task for waiting till all the requests are completed in order.
ASP.NET 4.5 came up with support for asynchronous execution of the same so that we can consume multiple resources at one time and thus saving the response time to the user.
To do this we need to perform some changes to the client application:
- Make your ASPX page to support Async operations by adding Async = “True”.
<%@ Page Language="C#" AutoEventWireup="true" CodeBehind="Details.aspx.cs" Inherits="ClientApplication.Details" Async="true" %>
- Now make your page_load method to behave Async by adding “async” to the method.
protected async void Page_Load(object sender, EventArgs e)
- Now instead of getting response as a string using the WebClient method: new WebClient().DownloadString("http://localhost:8687/api/Contacts");
Modify it to behave asynchronously by modifying the method DownloadStringTaskAsync(string address). DownloadStringTaskAsync downloads the resource as a String from the URI specified as an asynchronous operation using a task object.
var clientcontacts = new WebClient().DownloadStringTaskAsync("http://localhost:8687/api/Contacts");
var clientTemperature = new WebClient().DownloadStringTaskAsync("http://localhost:8687/api/Temperature");
var clientLocation = new WebClient().DownloadStringTaskAsync("http://localhost:8687/api/Location");
- Next step is to add code to ask the program to wait till all the above tasks are completed. In .NET 4.5 there is a keyword introduced called “await” which instructs the executing thread to wait till some specific Task method is completed. Here is the total code:
await Task.WhenAll(clientcontacts, clientTemperature, clientLocation);
The purpose of the above code is to wait till all the tasks have been completed.


You can go through MSDN to learn more about “Task” and the methods it supports.
- Immediately you would see red lines below the code for these 3 lines. This is because we are not executing the code synchronously and asking Task object to get back to us once the task is completed. So you cannot read the response directly instead you need now to specify .result to get the result of the task execution.
Modify the above code to as below:
var contacts = Newtonsoft.Json.JsonConvert.DeserializeObject<List<Contact>>(clientcontacts.Result);
var temperature = Newtonsoft.Json.JsonConvert.DeserializeObject(clientTemperature.Result);
var location = Newtonsoft.Json.JsonConvert.DeserializeObject(clientLocation.Result);
Now we are done with the code changes for consuming the API asynchronously using the ASP.NET 4.5 feature. Now let us run the program again.

Figure 10: Details page
Now you can find that the total time taken is 1 second for all the requests as all the requests have been executed in asynchronous manner and the time taken is less compared to the synchronous way of consuming the Web API.
Here is the total code for the client application:
<%@ Page Language="C#" AutoEventWireup="true" CodeBehind="Details.aspx.cs" Inherits="ClientApplication.Details" Async="true" %>
<!DOCTYPE html>
<html xmlns="http://www.w3.org/1999/xhtml">
<head runat="server">
<title></title>
</head>
<body>
<form id="form1" runat="server">
<div>
Contacts:<br />
<asp:ListView ID ="listContacts" runat="server">
<LayoutTemplate>
<table runat="server" id="table1" >
<tr runat="server" id="itemPlaceholder" ></tr>
</table>
</LayoutTemplate>
<ItemTemplate>
<tr id="Tr1" runat="server">
<td id="Td1" runat="server">
<%-- Data-bound content. --%>
<asp:Label ID="NameLabel" runat="server"
Text='<%#Eval("Name") %>' />
</td>
</tr>
</ItemTemplate>
</asp:ListView><br />
Temperature:<br />
<asp:Label ID ="lbltemperature" runat="server"></asp:Label><br />
Location:<br />
<asp:Label ID="lblLocation" runat="server"></asp:Label><br />
Elapsed Time:<br />
<asp:Label ID="lblElapsed" runat="server"></asp:Label><br />
</div>
</form>
</body>
</html>
using System;
using System.Collections.Generic;
using System.Net;
using System.Threading.Tasks;
namespace ClientApplication
{
public class Contact
{
public string Name { get; set; }
public string ContactNumber { get; set; }
}
public partial class Details : System.Web.UI.Page
{
protected async void Page_Load(object sender, EventArgs e)
{
string time = DateTime.Now.ToString();
var clientcontacts = new WebClient().DownloadStringTaskAsync("http://localhost:8687/api/Contacts");
var clientTemperature = new WebClient().DownloadStringTaskAsync("http://localhost:8687/api/Temperature");
var clientLocation = new WebClient().DownloadStringTaskAsync("http://localhost:8687/api/Location");
await Task.WhenAll(clientcontacts, clientTemperature, clientLocation);
time = time + DateTime.Now.ToString();
var contacts = Newtonsoft.Json.JsonConvert.DeserializeObject<List<Contact>>(clientcontacts.Result);
var temperature = Newtonsoft.Json.JsonConvert.DeserializeObject(clientTemperature.Result);
var location = Newtonsoft.Json.JsonConvert.DeserializeObject(clientLocation.Result);
listContacts.DataSource = contacts;
listContacts.DataBind();
lblLocation.Text = location.ToString();
lbltemperature.Text = temperature.ToString();
lblElapsed.Text = time;
}
}
}
Hope you liked this article!!!
Sunday, June 16, 2013
Useful technical sites, podcast URLs
Sites:
www.micrsoft.com/bizspark This is for startup companies from Microsoft…
www.communitymegaphone.com – You can find the User groups, events in your local and neighborhood areas.
Podcasts:
Sunday, June 9, 2013
Strongly Typed Data Controls in ASP.NET 4.5 with Visual Studio 2012
Before the introduction of ASP.NET 4.5, we used to bind the
data to the ASP.NET controls using DataSource property and bind the data using
the Eval(expression) function. Eval evaluates the expression and
displays the data in the display controls. ASP.NET 4.5 came up with new feature
called strongly typed data controls. The benefit of this feature is we can bind
the data to the display controls with strong types and we can avoid the
exceptions caused by the function Eval(expression) if the expression is not
evaluated to a proper value.

This article discusses with the sample code on how the
databinding was programmed before ASP.NET 4.5 and in ASP.NET 4.5. This example
uses Visual Studio 2012 and the project type created is a simple web site
project (Empty web site project). Add a default.aspx webform with code behind
if you do not see it in the project.
Before ASP.NET 4.5:
ASPX page:
We used Eval(expression) for binding the data to the
individual controls in the list view control below:
<p><u>Normal ASP.NET Binding</u></p>
<asp:ListView ID="displayData" runat="server">
<LayoutTemplate>
<table id="Table1" runat="server">
<tr id="Tr1" runat="server">
<td id="Td1" runat="server">Item ID</td>
<td id="Td2" runat="server">Item Name</td>
</tr>
<tr id="ItemPlaceholder" runat="server">
</tr>
</table>
</LayoutTemplate>
<ItemTemplate>
<tr>
<td>
<asp:Label ID="Label1"
runat="server"
Text='<%# Eval("ID")%>'>
</asp:Label>
</td>
<td>
<asp:Label ID="Label2" runat="server" Text='<%# Eval("ItemName")%>'>
</asp:Label>
</td>
</tr>
</ItemTemplate>
</asp:ListView>
Code behind for populating the data:
Create a class file called “Product” in a separate file and it will be added in “App_code” folder in the project. This type will be used in the code behind for populating the data of the type “Product”.
/// <summary>
/// Summary description for Product
/// </summary>
public class Product
{
public int ID { get; set; }
public string ItemName { get; set; }
}
/// <summary>
/// Page Load Method
/// </summary>
/// <param name="sender"></param>
/// <param name="e"></param>
protected void Page_Load(object sender, EventArgs e)
{
//bind the data to the list view by calling the method PopulateProducts.
displayData.DataSource = PopulateProducts();
displayData.DataBind();
}
/// <summary>
/// Method to create new product
/// </summary>
/// <returns></returns>
public IList<Product> PopulateProducts()
{
return new List<Product>
{
new Product{ID=1,ItemName="Item1"},
new Product{ID=2,ItemName="Item2"},
new Product{ID=3,ItemName="Item3"},
new Product{ID=4,ItemName="Item4"}
};
}
Code Execution:
Your output should like below:
Normal ASP.NET Binding
Item ID
|
Item Name
|
1
|
Item1
|
2
|
Item2
|
3
|
Item3
|
4
|
Item4
|
Re-writing the code
with ASP.NET 4.5:
In the ASP.NET 4.5 there is a new property available called
“ItemType” where you can define the type of the Item that is bound in the
control. Note, in some of the blogs/articles you see “ModelType” property
mentioned instead of “ItemType” as it was available in older versions.
Now add the following code to ASPX page:
<br />
<p><u>ASP.NET 4.5 Strong Binding</u></p>
<asp:ListView
runat="server" ID="displayData2"
ItemType="Product">
<LayoutTemplate>
<table id="Table1" runat="server">
<tr id="Tr1" runat="server">
<td id="Td1" runat="server">Item ID</td>
<td id="Td2" runat="server">Item Name</td>
</tr>
<tr id="ItemPlaceholder" runat="server">
</tr>
</table>
</LayoutTemplate>
<ItemTemplate>
<tr>
<td>
<asp:Label ID="Label1"
runat="server"
Text='<%# Item.ID%>'>
</asp:Label>
</td>
<td>
<asp:Label ID="Label2" runat="server" Text='<%# Item.ItemName%>'>
</asp:Label>
</td>
</tr>
</ItemTemplate>
</asp:ListView>
In the above code you can observe that the control has a
property called “ItemType” which is assigned with the Type that we are going to
use to bind the data. In our case it is “Product”. Also, to access the
properties of the Type, you need to use “Item.” and the property name will be
automatically displayed by the Intellisense. This makes the programmer to bind
the strong types to the controls.
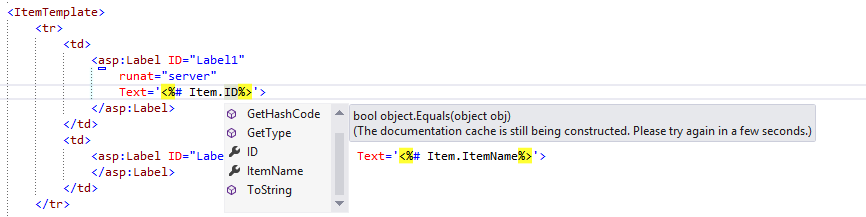
Figure: Showing the properties of Type using the
Intellisense
Now modify the Page_Load method to bind the data to the
second control as below:
/// <summary>
/// Page Load Method
/// </summary>
/// <param name="sender"></param>
/// <param name="e"></param>
protected void Page_Load(object sender, EventArgs e)
{
//bind the data to the list view by calling the method PopulateProducts.
displayData.DataSource = PopulateProducts();
displayData.DataBind();
//bind the data to the list view by calling the method PopulateProducts.
displayData2.DataSource = PopulateProducts();
displayData2.DataBind();
}
Code Execution:
Your output should like below:
ASP.NET 4.5 Strong Binding
Item ID
|
Item Name
|
1
|
Item1
|
2
|
Item2
|
3
|
Item3
|
4
|
Item4
|
Select Method:
In the above code, we set the data to the controls using
DataSource property of the control. We can also bind the data using the Select
method of the ASP.NET control instead of setting the DataSource property. Let
us see how we can do that now.
Modify your ASPX file to include another control as below:
<br />
<p><u>ASP.NET 4.5 Strong Binding with Select Method</u></p>
<asp:ListView
runat="server" ID="displayData3"
ItemType="Product"
SelectMethod="GetValidProducts">
<LayoutTemplate>
<table id="Table1" runat="server">
<tr id="Tr1" runat="server">
<td id="Td1" runat="server">Item ID</td>
<td id="Td2" runat="server">Item Name</td>
</tr>
<tr id="ItemPlaceholder" runat="server">
</tr>
</table>
</LayoutTemplate>
<ItemTemplate>
<tr>
<td>
<asp:Label ID="Label1"
runat="server"
Text='<%# Item.ID%>'>
</asp:Label>
</td>
<td>
<asp:Label ID="Label2" runat="server" Text='<%# Item.ItemName%>'>
</asp:Label>
</td>
</tr>
</ItemTemplate>
</asp:ListView>
Note in the above code we have set the value for
SelectMethod propery with a Code behind
method called “GetValidProducts”. The method “GetValidProducts” has
responsibility to get the data to be populated in the ListView control. The
method used here should either support IEnumerable or IQueryable type to be
able to populate the Type data.
Now let us define a method in the code behind for the same:
/// <summary>
/// Method to get the products using IEnumerable
/// </summary>
/// <returns></returns>
public IEnumerable<Product> GetValidProducts()
{
//You can add additional criteria for displaying the products by
//modifying the code in this method
return PopulateProducts().AsQueryable();
}
As mentioned in the commented code, you can modify the
method to include the criteria to check some business logic and refine the data
to be returned by the method.
Code Execution:
Now, if you execute the code you should see the data getting
populated as below:
ASP.NET 4.5 Strong Binding with Select Method
Item ID
|
Item Name
|
1
|
Item1
|
2
|
Item2
|
3
|
Item3
|
4
|
Item4
|
Note: Similar to
SelectMethod, you can also write methods for Update, Insert and Delete
operations.
Final output should look like below:
Normal ASP.NET Binding
Item ID
|
Item Name
|
1
|
Item1
|
2
|
Item2
|
3
|
Item3
|
4
|
Item4
|
ASP.NET 4.5 Strong Binding
Item ID
|
Item Name
|
1
|
Item1
|
2
|
Item2
|
3
|
Item3
|
4
|
Item4
|
ASP.NET 4.5 Strong Binding with Select Method
Item ID
|
Item Name
|
1
|
Item1
|
2
|
Item2
|
3
|
Item3
|
4
|
Item4
|
Hope you liked this article!!! Happy coding!!!
Subscribe to:
Posts (Atom)