Tuesday, March 1, 2016

Create a task in Task Scheduler using PowerShell Script


We all know how to create a task in Task Scheduler. When we create a task we need to add many settings to run the task periodically as per the settings. But what to do when we want to create the same task in multiple environments in your project. Creating them manually is a tedious task and as usual Microsoft heard you and provided the option to configure the tasks using the mighty powerful “PowerShell script”. But with one exception that this is available for Windows 8.1 and higher and Windows 2012.

To demonstrate the powerful PowerShell capability, let’s dive in.

I want to create the following task in order to run a testapp.exe periodically.

We want to accomplish the following:

Create a new task and the task name should be “Test Task” and it should run as “NT Authority”.

clip_image001

Figure 1: General properties

Trigger tab should be set with the settings as

1. It should run daily and start date is 3/1/2016 and at 12:00:00 AM and it should recur for every 1 day.

2. Also the task should repeat every one hour and it should run for a duration of 1 hour.

clip_image003

Figure 2: Trigger settings

The action tab should be configured to run the program “TestApp.exe” which is located in C Drive.

clip_image005

Figure 3: Action settings

Our settings tab should be configured with the following settings:

1. Allow task to run on demand

2. If the task fails, restart every 1 hour and it should attempt restarting for 3 times

3. If the task runs for more than 1 hour then stop it and also force it to be stopped if it’s not stopping

clip_image007

Figure 4: Setting tab

Let us write the PowerShell script to accomplish the above mentioned task in the task scheduler. Here are the steps:

Step 1: Name of the task.

Create a variable and assign task name. In our case it should be “Test Task”.

# Name of Task to create

$taskName = "Test Task"

Step 2: Set the credentials.

Create two more variables and assign it the credentials.

In our case, we want the task to run as “NT Authority” and password is not required. But if you want to run with a particular account username and password, create username and password variables and assign them the values.

# UserName to run task as

$user = "NT AUTHORITY\SYSTEM"

# Password for above user

#$password = "userPassword" Uncomment this line if you need to set up password

Step 3: Now create the task

In our case we do not have any arguments. But if you need to add then uncomment the $argument line and set the $argumentvalue

$action defines the action to perform i.e. to execute the exe file and uncomment the argument parameter after the exe if you need to add it.

$trigger defines the trigger settings

$settings defines the settings settings

#$argument = "-Noninteractive -Noprofile -Command &'" + $argumentvalue + "'"

$action = New-ScheduledTaskAction -Execute "C:\MyTestApp.exe" #-Argument $argument

$trigger = New-ScheduledTaskTrigger -Daily -At 12am

$settings = New-ScheduledTaskSettingsSet -ExecutionTimeLimit (New-TimeSpan -Minutes 60)

$settings.RestartCount=3

$settings.RestartInterval = 'PT01H'

Step 4: Get the instance of scheduled task by specifying New-ScheduledTask command and set the action and trigger and register the scheduled task.

$inputObject = New-ScheduledTask -Action $action -Trigger $trigger -Settings $settings

Register-ScheduledTask -TaskName $taskName -InputObject $inputObject -User $user

Step 5: Now wait for 5 seconds and then set the trigger repetition interval and duration and set the scheduled task.

Start-Sleep -Seconds 5

$t = get-scheduledtask -TaskName $taskName

$t.Triggers.repetition.Duration = 'PT60M'

$t.Triggers.repetition.Interval = 'PT01H'

$t | Set-ScheduledTask

The completed script will look as below:

# Name of Task to create

$taskName = "Test Task"

#$argumentvalue = "first"

# UserName to run the task created as

$user = "NT AUTHORITY\SYSTEM"

# Password for above user

#$password = "userPassword"

# Create Task

#$argument = "-Noninteractive -Noprofile -Command &'" + $argumentvalue + "'"

$action = New-ScheduledTaskAction -Execute "C:\MyTestApp.exe" #-Argument $argument

$trigger = New-ScheduledTaskTrigger -Daily -At 12am

$settings = New-ScheduledTaskSettingsSet -ExecutionTimeLimit (New-TimeSpan -Minutes 60)

$settings.RestartCount=3

$settings.RestartInterval = 'PT01H'

$inputObject = New-ScheduledTask -Action $action -Trigger $trigger -Settings $settings

Register-ScheduledTask -TaskName $taskName -InputObject $inputObject -User $user

Start-Sleep -Seconds 5

$t = get-scheduledtask -TaskName $taskName

$t.Triggers.repetition.Duration = 'PT60M'

$t.Triggers.repetition.Interval = 'PT01H'

$t | Set-ScheduledTask

The above few lines of code will do the job of creating the task with the same settings and you can automate it so that you can run wherever you want.

When you run the script you should see following screen:

clip_image009

Figure 5: Script execution

A trick if you do not know how to set the parameters for the commands. Go to “Windows PowerShell ISE” and run as administrator if needed and type the command that you want to add to the script by using the command window as below:

clip_image011

Figure 6: Command window

You can find more commands in the MSDN and hope this article is useful for creating a basic task in the task scheduler using the PowerShell script. With the growth of automation and agile methodologies everywhere, it would be beneficial for the teams to explore the PowerShell more and more and to replace your manual tasks wherever it is possible.

Thursday, February 25, 2016

IaaS, Internal Load Balancing (ILB) in AZURE


When we speak of cloud we always think of Platform as a service (PaaS), Infrastructure as a service (IaaS) and Software as a Service (SaaS).

In this article we discuss about the IaaS and how to scale websites or applications running in virtual machines that forms a part of IaaS infrastructure. In simple terms, IaaS means we buy a storage from cloud provider and we deploy or create our own machines or provider’s pre-built Images and we control the infrastructure like operating systems, ports and all the software installed on the machines.

Common scenarios for opting to IaaS is when a company wants to setup a testing environment for a particular period of time, or a dev team is doing some R&D and needs a machine with particular configuration for temporary purpose and later those machines will be decommissioned. This way, we do not need to invest on the infrastructure that we use only for a particular amount of time. But this may not be correct always. It always depends upon the requirements.

Before jumping into the details on how to create ILBs, let us try to understand how ILBs differ from typical load balances (F5s).

F5 Load Balancers:

Figure1 load balancers -second

Figure 1: F5 Load balancers (Firewall sitting between is optional)

F5 load balancers primarily sit between clients and the hosts that provide the services.

F5 load balancers typically are used when we expose our services to the outside of our company network. This does not mean they will not be used within the company network. But when we deploy our services or applications in ON PREMISE and want to expose the services/applications to the outside world.

The typical transaction flow will be as follows:

Let us make the following assumptions to understand the transaction flow:

Load Balancer URL – 192.168.89.1

Web Server 1 – 192.168.77.76

Web server 2 – 192.168.77.77 and the service name - weatherinfo

Figure 2 Sequence diagram

Figure 2: Load balancing flow between the clients and the hosts through Load Balancers

Load Balancers uses the health monitoring mechanism to periodically check the health of the hosts and accordingly will forward the request to the host. A simple health check mechanism will be PINGING to the server and checking for the response. Next level mechanism is to deploy the health check application that provides the health of the intended service and gives accurate information to the Load balancer if it has to forward a request or not.

If health of all the hosts are good then LBs use Round Robin as a simple mechanisms to complex algorithms based on connection counts, host utilization and other important criterion to decide which host needs to be responding to a particular request.

Internal Load Balancers (ILBs):

ILBs comes into picture when we talk about Cloud services created in AZURE, AWS and so on. Unlike Load balancers, ILBs supports the following types of load balancing:

- Load balancing between the virtual machines within a cloud service.

- Load balancing between virtual machines between different cloud services that are contained within a virtual network.

In this article, we would be going through the first type i.e. load balancing of incoming internet traffic to different virtual machines within a cloud service. This is also called as Network Level type of load balancing.

clip_image006

Figure 3: ILB with VMs

Let’s go through the steps to create the ILB by creating two virtual machines and creating a load balanced set to load balance the two VMs. There is no direct way to create Load Balanced set in portal and it should be done as a part of creation of VMs.

Step 1: Create a cloud service first so that we can add the VMs to the cloud service. (I am not using portal instead I am using manage.windowsazure.com for this article)

clip_image008

clip_image010

Figure 4: Creation of cloud service

2. Create a Virtual machine.

clip_image012

Figure 5: Selecting Compute à Virtual Machine

clip_image014

Figure 6: Choosing the image (Windows server 2012 R2 Datacenter)

clip_image016

clip_image018

Figure 7: VM Configuration

clip_image020

Figure 8: Added HTTP and HTTPS endpoints by clicking “Add” button on the bottom of the page

Step 3: Now select HTTPS endpoint and click edit icon and create a LOAD-BALANCED SET. I want to load balance the VMs through the port 443.

clip_image022

Figure 9: Editing the HTTPS endpoint to create a Load Balanced set

clip_image024

Figure 10: Setting the load-balanced set details

In the figure 9, Probe Protocol indicates which protocol does the load balancer should use to probe the health of the VM and the port denotes the port to be used, Probe Interval tells the load balancer to attempt a TCP connect to the specified probe port for every 15 seconds. If it did not get TCP ACK back for two times (Number of probes), then it will consider that the node is offline and will stop traffic to that node.

clip_image026

Figure 11: Check the load-balanced set is created on HTTPS endpoint 443.

Now create another VM by following the above steps and then add a HTTPS endpoint and select option “Add an endpoint to an Existing load balanced set” and proceed.

clip_image028

Figure 12: Adding an endpoint to an existing load balanced set

After completing the above steps, create a website in IIS for both the VMs and expose the sites on port 443. I have created a website with a simple html page in both the VMs. For VM1, the html displays the text “This is from WEBMAC1” and for VM2 it displays “This is from WEBMAC2”.

Now when I browse

clip_image030

Figure 13: Website page

Now browse the cloud service and you should see the web page randomly displaying the messages from the both the boxes. Try to stop the website in one of the box or stop the VM and see if you are still able to browse. It should not be trying to hit the stopped VM or website.

Additional points:

In the figure 6 while creating VMs, I did not add “Availability Set”. But if you create one and assign it to both the VMs, Windows Azure will make sure that the two VMs are created on separate racks in the data center. This will also help during the host patching by not taking down all the nodes at same time and makes sure that your application will always run. This is most critical in any organization that needs 24/7 availability.

Also while configuring load balanced set, I have configured on TCP port. But you can do the same with HTTP port. This will allow you to write your own website or app that informs the health of the application which is more accurate than hitting the TCP port. You can add your custom logic to tell if the application is healthy. For example, if your application is not able to talk to database from the hosted server, you do not want the requests to be forwarded to that server and thus you can eliminate error screens for clients.

One more thing is that I have used same port 443 for both application and probing port. In real time situations they need not be or will not be same. Also for HTTP probes make sure that the application on that port does not support any authentication mechanism. It should respond without providing any credentials.

In real time scenarios, we will not follow the manual steps mentioned in the article. It will be easier to perform these in automated fashion using Powershell. You can check MSDN for more information on using Powershell scripts.

Saturday, August 1, 2015

Pipes and Filters Pattern

 
Requirements: To understand the article, a basic knowledge of OOPs and Visual studio is required along with the C# basic knowledge programming.

I tried to explain the article in such a fashion that simulates the typical software projects environment. The program developed in this article does not actually publish message to any queue. Just to simulate the message being encrypted and priority set, added some properties in the Message to support them. But in actual projects, we might be doing the job in different manner.

Existing system:
Company ABC wants to build a new application called “Messenger” that publishes the messages to MSMQ. They are expecting two new consumers to this application as soon as it is developed. One consumer will be publishing sensitive data and so expects the message to be encrypted while publishing it to the Queue and also wants to set the priority for message. The other consumer will be publishing simple text data that does not need any encryption and only sets the message priority.
New requests from other consumers are expected in soon and the application should be built in such a way to incorporate any changes to the existing architecture in future.

So the Application manager approaches the technical team with following problem statement:
I want to publish a message to a queue and it should undergo certain transformations or perform certain operations before publishing it.
I want my code design to support adding new operations or removing the existing operations.

Then the Architect/Technical lead jumps in and proposes “Pipes and Filters Pattern” as the solution to the problem and provides the design to the development team with the High level details as below:


Figure 1 – Publishing message to the Queue

Color depictions used in the diagram: Incoming message is in green color gets transformed to blue color after the message priority is set and then transformed to orange color after message is encrypted and sent as an output.

High Level Details:
- Pipes and Filters architectural pattern is one of the Messaging Patterns which helps in splitting a large set of operations on a message into different processes so that each process can work on the message independently and complete the transformation of the message.
- Here each process will be called as “Filters” and they are connected through the channels or connectors called “Pipes”.
- All the filters implement a common interface so that all will conform to the contract that they are supposed to work on.
- Message from the source will be set as input to the process and the output or result of the process will be sent as an input to another process and so on until it reaches the sink or destination process. (Note: Here terms “Process” and “Filters” are used interchangeably.
- In the above diagram first process sets the message priority by taking the incoming message through pipe and then sends the output to another process to encrypt the message.
- Then the outgoing message is published to the Queue.

Advantages and disadvantages of this architectural pattern:
- All the filters or operations are independent and each can plugged into or unplugged without affecting the other one. So this is a great feature that can be specialized for each consumer of the feature.
- Because the filters are independent of each other, you cannot establish any communication between the filters and the message can be sent sequentially i.e. in a linear fashion.
Then the architect provides the low level design for the implanting the solution as below:

Class diagram:


Figure 2 – Class diagram

Class Diagram in Detail:

All operations expose one interface so that they comply with the interface implementation. In our example, Setting Message Priority and Encrypting the Message are the two operations or filters that needs to be implemented on the source message before publishing.

So we created an interface “IOperation<T>” which supports generic data type so that the implementing classes adhere to the type it should support and implement the method of the interface “Execute(T input)” which takes the generic type T as the input and returns the same type. This also helps in different types to implement the same interface. This interface has only one method “Execute” which should be implemented by the implementing classes. This method takes input parameter type, performs operation and returns the same type.

Note: Since we are working with messages, always message will be the input and output for the filter or operation methods and so our method Execute supports that.

Now coming to the operations: We need to create classes each performing one operation and which takes the same input type and returns the same type. As per the requirements, we need to create two classes “EncryptMessage” and “MessagePriority” which encrypts and sets the priority for the message.

Now there must be some way that tells which operations have to be registered from the incoming message. This job will be done by the pipeline classes. So we created an abstract base class “Pipelinebase” for pipeline that supports generic types and it has methods for registering the operations and performing the operations. As per our requirement, we need one pipeline that sends a message from the client to the messaging queue and so we named our pipeline class as “SendPipeline” which inherits the behavior of the base class “Pipeline” and also created an interface that defines our message called “IMessage” and our SendPipeline class supports the classes that implement the IMessage interface.

Also the SendPipeline class should have a constructor that takes Boolean parameters for each message operation. Since, we have only two operations, we are creating a constructor that takes two Boolean parameters. If you have more number of parameters, it is advisable to use the enums with flag attribute or a type instance that carries all the setting properties.

Then the development team comes with the coding implementation as per the class diagram and specifications provided by the architect as below:

Coding in Action:

IOperation interface: This interface supports generic type and all the classes that implement this interface will be implementing the Execute method that takes and returns the same type.
namespace PipesAndFiltersExample
{
    /// <summary>
    /// Operation Interface
    /// All operations must implement the interface
    /// </summary>
    /// <typeparam name="T">Data type supported in the operation</typeparam>
    public interface IOperation<T>
    {
        /// <summary>
        /// Executes the operation
        /// </summary>
        /// <param name="input">The Input Parameter</param>
        /// <returns>Type defined for the operation</returns>
        T Execute(T input);
    }
}

EncryptMessage class: This class encrypts the incoming message and implements the interface IOperation<IMessage>.
namespace PipesAndFiltersExample
{
    /// <summary>
    /// Encrypts the message
    /// </summary>
    class EncryptMessage : IOperation<IMessage>
    {
        /// <summary>
        /// Executes the operation on the message
        /// </summary>
        /// <param name="input">The Input Message</param>
        /// <returns>Type of IMessage</returns>
        public IMessage Execute(IMessage input)
        {
            return Encrypt(input);
        }
        /// <summary>
        /// Encrypts the message
        /// </summary>
        /// <param name="input">The Input Message</param>
        /// <returns>Type of IMessage</returns>
        private IMessage Encrypt(IMessage input)
        {
            input.IsEncrypted = true;
            //Encryption code
            return input;
        }
    }
}

MessagePriority class: This class sets the message priority and implements the interface IOperation<IMessage>.
namespace PipesAndFiltersExample
{
    /// <summary>
    /// Sets Message priority to the incoming message
    /// </summary>
    class MessagePriority:IOperation<IMessage>
    {
        /// <summary>
        /// Executes the operations
        /// </summary>
        /// <param name="input">The input message</param>
        /// <returns>Message with the priority set</returns>
        public IMessage Execute(IMessage input)
        {
            input.Priority = 1;
            return input;
        }
    }
}

IMessage interface:
namespace PipesAndFiltersExample
{
    /// <summary>
    /// Message Interface
    /// </summary>
    public interface IMessage
    {
        /// <summary>
        /// Priority of the message
        /// </summary>
        int Priority{get;set;}
        /// <summary>
        /// Field that needs to be implemented by the
        /// implementing the classes
        /// </summary>
        bool IsEncrypted { get; set; }
        /// <summary>
        /// Tells if the message is encrypted
        /// </summary>
        /// <returns></returns>
        bool IsMessageEncrypted();
        /// <summary>
        /// Tells if the priority is set
        /// </summary>
        /// <returns></returns>
        bool IsMessagePrioritySet();
        /// <summary>
        /// Message Id of the message
        /// </summary>
        string MessageId {get;}
        /// <summary>
        /// Body of the message
        /// </summary>
        string Body { get; }
        /// <summary>
        /// Header of the message
        /// </summary>
        string Header { get; }
        /// <summary>
        /// Subject of the message
        /// </summary>
        string Subject { get; }
    }
}


Message class: This class implements the interface IMessage.
namespace PipesAndFiltersExample
{
    /// <summary>
    /// Message class
    /// </summary>
    public class Message:IMessage
    {
        /// <summary>
        /// boolean variables
        /// </summary>
        private string messageId;
        private string body;
        private string header;
        private string subject;
        /// <summary>
        /// Properties to be set
        /// </summary>
        public int Priority { get; set; }
        public bool IsEncrypted { get; set; }
        /// <summary>
        /// Property that returns MessageId
        /// </summary>
        public string MessageId
        {
            get { return messageId; }
        }
        /// <summary>
        /// Property that returns body of the message
        /// </summary>
        public string Body
        {
            get { return body; }
        }
        /// <summary>
        /// Property that returns the header of the message
        /// </summary>
        public string Header
        {
            get { return header; }
        }
        /// <summary>
        /// Property that returns subject of the message
        /// </summary>
        public string Subject
        {
            get { return subject; }
        }
        /// <summary>
        /// Constructor for the class Message
        /// </summary>
        /// <param name="messageId">The MessageId</param>
        /// <param name="body">The Body</param>
        /// <param name="header">The Header</param>
        /// <param name="subject">The Subject</param>
        public Message(string messageId, string body, string header, string subject)
        {
            this.messageId = messageId;
            this.body = body;
            this.header = header;
            this.subject = subject;
        }
        /// <summary>
        /// Informs if the message is encrypted
        /// </summary>
        /// <returns>The value true/false</returns>
        public bool IsMessageEncrypted()
        {
            return IsEncrypted;
        }
        /// <summary>
        /// Informs if the message priority set
        /// </summary>
        /// <returns>The value true/falses</returns>
        public bool IsMessagePrioritySet()
        {
            return (Priority != 0);
        }
    }
}


Pipelinebase abstract class: This class has two methods Register and PerformOperation. Register method takes an IOperation<T> as an input and adds it to the list type operations in the class. So, based on the choice of the clients, all the required operations will be added to the list through Register method and then PerformOperation method loops through all the operations and executes the method “Execute” of the each operation. Each operation takes an input message and performs the operation and then the resultant message will be sent to another operation and likewise till all the operations are completed.
using System.Collections.Generic;
using System.Linq;
namespace PipesAndFiltersExample
{
    /// <summary>
    /// Base class for the pipeline classes
    /// </summary>
    /// <typeparam name="T">Type supported by the Pipeline base</typeparam>
    public abstract class Pipelinebase<T>
    {
        private readonly List<IOperation<T>> operations = new List<IOperation<T>>();
        /// <summary>
        /// Registers the operation
        /// </summary>
        /// <param name="operation">The operation</param>
        /// <returns>The instance of the class</returns>
        public Pipelinebase<T> Register(IOperation<T> operation)
        {
            this.operations.Add(operation);
            return this;
        }
        /// <summary>
        /// Perform the operation
        /// </summary>
        /// <param name="input">The input message</param>
        /// <returns>The instance of the class</returns>
        public T PerformOperation(T input)
        {
            return this.operations.Aggregate(input, (current, operation) => operation.Execute(current));
        }
    }
}


SendPipeline class: This class has a constructor that takes two parameters bool setPriority, bool encryptMessage and registers the operation classes based on the parameter values.
namespace PipesAndFiltersExample
{
    /// <summary>
    /// Pipeline that sends message to the destination by performing operations
    /// on the incoming message
    /// </summary>
    public class SendPipeline : Pipelinebase<IMessage>
    {
        /// <summary>
        /// Constructor for the class where the operations are registered
        /// for the messages
        /// </summary>
        /// <param name="setPriority">The Set Priority parameter</param>
        /// <param name="encryptMessage">The Encrypt Message parameter</param>
        public SendPipeline(bool setPriority, bool encryptMessage)
        {
            if (setPriority)
            {
                Register(new MessagePriority());
            }
            if (encryptMessage)
            {
                Register(new EncryptMessage());
            }
        }
    }
}

Created two console applications to demonstrate the two clients. One client wants to encrypt and set the message priority and the other just wants the message priority to be set.

Client 1 program:

using PipesAndFiltersExample;
using System;
namespace Client1
{
    class Program
    {
        static void Main(string[] args)
        {
            IMessage message = new Message(messageId:"1",
                body:"This is the message body",
                header:"Header Information",
                subject:"Please set priority and encrypt the message");
            //sending code to the pipeline and the message is encrypted and published into the queue
            SendPipeline sendPipeline = new SendPipeline(true,true);
            var publishedMessage = sendPipeline.PerformOperation(message);
            Console.WriteLine("I am client1 and my messages should be prioritized and encrypted!!!");
            Console.WriteLine("My message Priority Set? {0}", publishedMessage.IsMessagePrioritySet());
            Console.WriteLine("My message Encrypted? {0}", publishedMessage.IsMessageEncrypted());
            Console.WriteLine();
            Console.Read();
        }
    }
}

Client 2 program:

using PipesAndFiltersExample;
using System;
namespace Client2
{
    class Program
    {
        static void Main(string[] args)
        {
            IMessage message = new Message(messageId: "1",
                body: "This is the message body",
                header: "Header Information",
                subject: "Please set priority and encrypt the message");
            //sending code to the pipeline and the message is encrypted and published into the queue
            SendPipeline sendPipeline = new SendPipeline(true, false);
            var publishedMessage = sendPipeline.PerformOperation(message);
            Console.WriteLine("I am client2 and my messages should only be prioritized and not encrypted!!!");
            Console.WriteLine("My message Priority Set? {0}", publishedMessage.IsMessagePrioritySet());
            Console.WriteLine("My message Encrypted? {0}", publishedMessage.IsMessageEncrypted());
            Console.WriteLine();
            Console.Read();
        }
    }
}

When you run the code, you should see the following:

Client 1 program:

Figure 3 – Client 1 Program output shows that the message is encrypted and the priority is set

Client 2 program:

Figure 4 – Client 2 Program output shows that the message priority is set but not encrypted


You can start two projects by right clicking the solution and select “Set StartUp Projects…” and select “Start” for the two projects in the “Action” column and you should be good to run two console applications at one shot as below:

Figure 5 – Starting two projects at one shot

Sunday, August 17, 2014

Asynchronous Programming in C# – Part 2: Tasks


As discussed in the previous article, though Thread pool helps us up to certain extent of reusing and managing the threads, still it lacks the built in mechanism to know when the operation has finished and what did the thread return back.

So to help programmers to concentrate on the job Microsoft has introduced Task, which is an object that represents some work that should be done. Also Task has the capability to let you know if the work is completed and if a operation returns a result, Task returns you a result.

A Task Scheduler is responsible for starting the Task and managing it. By default the Task Scheduler uses threads from the thread pool to execute the Task.

Basic usage of Task is to make your application being responsive all the time. We make the main thread or thread running the UI free from any background time consuming jobs by creating a Task which internally will be using another thread from the Thread pool to complete the operation. But, note that it helps only in making the application responsive or parallelize your work in order to use the multiple processors available in the computer but does not scale the application.

Task is a part of System.Threading.Tasks name space and it has two forms. One which returns a parameter and another that returns nothing or void.
  • Task<T> which returns a value
  • Task which does not return any value
You can create instances of Task object using a new Task(Action) or using Factory class that creates a instance of Task.

Here is the program for a task (Developed using .NET 4.0) that shows
1) Creation of Task objects
2) Task that returns no value and a Task that returns a value:

using System;
using System.Threading;
using System.Threading.Tasks;
namespace TaskTest
{
    class Program
    {
        static void Main(string[] args)
        {
            Console.WriteLine("Main Thread {0}", Thread.CurrentThread.ManagedThreadId);
            //Create a task using new keyword
            Task t = new Task(() =>
            {
                Console.WriteLine("Task created using instantiation of Task class and passing Action as a parameter");
            });
t.Start();
            //Create a task using Factory
            //Task.Factory gives access to Factory methods to create instances of Task and Task<T>
            Task taskFactory = Task.Factory.StartNew(() =>
            {
                Console.WriteLine("Task created using Task.Factory");
            });
            Console.WriteLine("**********************TASK WITH NO RETURN VALUE***********************");
            Console.WriteLine("Before creating a new task that does not return a value");
            Task taskWithNoReturnValue = Task.Factory.StartNew(() =>
                {
                    Console.WriteLine("TASK WITH NO RETURN VALUE RUNNING ON THREAD {0}", Thread.CurrentThread.ManagedThreadId);
                });
            Console.WriteLine("After creating  a task that does not return a value");
            Console.WriteLine("**********************TASK WITH RETURN VALUE***********************");
            Console.WriteLine("Before creating a new task that returns a value");
            Task<int> taskWithReturnValue = Task.Factory.StartNew(() =>
            {
                Console.WriteLine("TASK WITH NO RETURN VALUE RUNNING ON THREAD {0}", Thread.CurrentThread.ManagedThreadId);
                return 6;
            });
            //Console.WriteLine("The return value from the task is {0}", taskWithReturnValue.Result);
            Console.WriteLine("After creating  a task that returns a value");
            Console.Read();
        }
    }
}
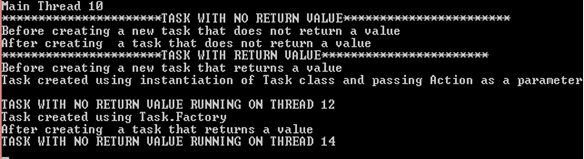
Output:
image

new Task(Action action) / Task.Factory.StartNew(Action action) queues the specified work to run on the thread pool and returns a task handle for that work.

Observe from the output of the program that Main Thread Id is 10 and the tasks are running on 12 and 14. Also notice that the messages “Before…” and “after..” are printed first than the operation performed by the Task. This tells that UI thread or Main thread is running in parallel to the Tasks. Also notice that we are not reading the Task return value in the program. We cannot control the flow of Tasks execution as they each run in a parallel mode on a new thread.

Let us see what happens if we read the value 6 from the Task. Uncomment the commented line that reads and displays the Task’s return value. You can get the result of the Task by property “Result”. Check the output now:

image

The main thread has to wait till the Task’s operation is completed and so you find that first, Task return value is displayed and after that “After..” message is displayed. If the Task is not finished, this call will block the current thread.

So, Task.Result will block the thread that is trying to read the result to wait until the task completes its operation and then the next line of code execution takes place.
There is one more method that makes the current thread to wait and this is similar to Thread.Join(). The method is Task.Wait().

Continuation operation to the Task’s operation:
System.Threading.Tasks class has another method called ContinueWith which creates a continuation task that runs another operation to execute as soon as the Task finishes. There are couple of overloads available for the ContinueWith method that you can configure when the continuation operation will run. It works both with the Task and Task<T> in which the prior case it takes Action as a parameter and in the later case the method accepts Func<<Task<T>,T> as a parameter. For example, in the above program if you want to continue with another operation once the Task<int> is finished, you can add the continuation task as below:

Task<int> taskWithReturnValue = Task.Factory.StartNew(() =>
           {
               Console.WriteLine("TASK WITH NO RETURN VALUE RUNNING ON THREAD {0}", Thread.CurrentThread.ManagedThreadId);
               return 6;
           }).ContinueWith((i) => {return i.Result*5;});

In this case, once the Task<int> completes the operation, then it continues with another operation that takes the result of Task<int> and multiplies the result with 5. So, the return value will be 30 instead of 6 as in the above program. Here is the output:

image

You can use the continuation method for different scenarios like:
  • When the Task is cancelled, if a certain operation is to be performed.
  • If you want to perform some operation if a Task is faulted.
  • If you want to perform some operation if a Task is finished its operation.
Here is a sample program to demonstrate the continuation operations:

static void Main(string[] args)
        {
            Task<string> task = Task.Factory.StartNew(() =>
                {
                    return "Hello EveryOne";
                });
            task.ContinueWith((s) =>
                {
                    Console.WriteLine(" I am completed!!!");
                },TaskContinuationOptions.OnlyOnRanToCompletion);
            task.ContinueWith((s) =>
                {
                   Console.WriteLine(" I am cancelled!!!");
                }, TaskContinuationOptions.OnlyOnCanceled);
            task.ContinueWith((s) =>
            {
                Console.WriteLine(" I am faulted!!!");
            }, TaskContinuationOptions.OnlyOnFaulted);
            Console.WriteLine(task.Result);
            Console.Read();
        }

Output:

image

Since in the program, the Task successfully completed its operation, only continuation option when Task is completed is executed. Had the Task got cancelled or faulted then the other operations would have been displayed.

The option OnlyOnFaulted executes only if the antecedent throws an unhandled exception. Change the above program code as below:

class Program
    {
        static void Main(string[] args)
        {
           Task<string> task = Task.Factory.StartNew(() =>
                {
                    throw new AggregateException("This task cannot execute!!!");
                    return "Hello EveryOne";

                });
            task.ContinueWith((s) =>
                {
                    Console.WriteLine(" I am completed!!!");
                },TaskContinuationOptions.OnlyOnRanToCompletion);
            task.ContinueWith((s) =>
                {
                   Console.WriteLine(" I am cancelled!!!");
                }, TaskContinuationOptions.OnlyOnCanceled);
            task.ContinueWith((s) =>
            {
                Console.WriteLine(" I am faulted!!!");
            }, TaskContinuationOptions.OnlyOnFaulted);
           //Console.WriteLine(task.Result);
            Console.Read();
        }

Note that I have commented out the line to display the result as it goes to exception and you cannot display the result. Also observe that in this program antecedent is the task created in the below line:


Task<string> task = Task.Factory.StartNew(() =>
                {
                    throw new AggregateException("This task cannot execute!!!");
                    return "Hello EveryOne";

                });

With ContinueWith is going to take the result of task and then creates a new Task to perform another operation. If an exception occurs in task operation, then it will propagated to the ContinueWith task’s operation and displays the message “I am faulted”.

  task.ContinueWith((s) =>
                  task.ContinueWith((s) =>
            {
                Console.WriteLine(" I am faulted!!!");
            }, TaskContinuationOptions.OnlyOnFaulted); Output:
image

Press continue and you will see the message below:
image

Task Cancellation:

Here is a simple program to demonstrate the task cancellation:

class Program
    {
        /// <summary>
        /// Method that runs time consuming task.
        /// This method accepts CancellationToken as a parameter.
        /// This program loops through 1 to 2000 and before the count reaches 2000
        /// if user hits any of the key then the tokensource is set to cancel and the token
        /// gets the cancellation request and the loop will get break and control returns to the
        /// Main program.
        /// </summary>
        /// <param name="ct"></param>
        static void RunTimeConsumingTask(CancellationToken ct)
        {
            if (ct.IsCancellationRequested)
            {
                Console.WriteLine("Cancellation request is sent and the operation is still in the execution");
                return;
            }
            for (int i=1;i<=2000;i++)
            {
                Console.WriteLine("Operation code {0} is completed", i);
                Thread.Sleep(1000);
                if (ct.IsCancellationRequested)
                {
                    Console.WriteLine("Cancelled before completing operation code 2000");
                    break;
                }
            }
        }
        static void Main(string[] args)
        {
            var tokenSource = new CancellationTokenSource();
            var token = tokenSource.Token;
            Console.WriteLine("Press enter or any key to cancel");
            Task<string> task = Task.Factory.StartNew(() =>
                {
                    RunTimeConsumingTask(token);
                    return "Hello EveryOne";
                });
            Console.ReadLine();
            tokenSource.Cancel();
            task.Wait();
            Console.Read();
        }
Output:
image

Here when the loop is reached to 4, if any key is hit then the task is cancelled.

Another program to demonstrate the “TaskContinuation.OnlyOnCanceled”:

In the below program task is the instance of Task class that always looks for the CancellationToken. The CancellationToken propagates the notification that operations should be cancelled.  The CancellationTokenSource is used to signal that the Task should cancel itself.
Another statement to note is below:
token.ThrowIfCancellationRequested();

This statement throws System.OperationCanceledException if token has cancellation requested and this lets the outside the Task code to let the program know that task is getting cancelled. The “ContinueWith” is added to display the message when task is cancelled by creating another task and adding TaskContinuation.OnlyOnCanceled.

static void Main(string[] args)
        {
            var cancellationTokenSource = new CancellationTokenSource();
            CancellationToken token = cancellationTokenSource.Token;
            Task task = Task.Factory.StartNew(() =>
                {
                    while (!token.IsCancellationRequested)
                    {
                        Console.WriteLine("Executing tasks");
                        Thread.Sleep(1000);
                    }
                    token.ThrowIfCancellationRequested();
                }, token).ContinueWith((t) =>
                    {
                        Console.WriteLine("Task is cancelled");
                    }, TaskContinuationOptions.OnlyOnCanceled);
                Console.WriteLine("Press any key to end the task");
                Console.ReadLine();
                cancellationTokenSource.Cancel();
                task.Wait();
            Console.WriteLine("Press enter to end the application");
            Console.ReadLine();
        }
Output:
image
When enter key is pressed the task is cancelled and the message “Task is cancelled” is displayed.

Nested Tasks:
One task can encapsulate another task or a number of tasks. Nested tasks does not necessarily ensure that outer task waits for the inner tasks to complete.
A simple program to demonstrate the nested tasks:
/// <summary>
        /// Program to show dependencies between Parent
        /// and child tasks
        /// </summary>
        /// <param name="args"></param>
        static void Main(string[] args)
        {
            //parent task created with Task.Factory.StartNew
            //This task is the outer task which is going to encapsulate
            //inner tasks or child tasks
            var parent = Task.Factory.StartNew(() =>
            {
                Console.WriteLine("Parent Task statement1");
                //Create a TaskFactory. Once you create a TaskFactory instance, you can create as many tasks
                //as needed.
                TaskFactory tf = new TaskFactory(TaskCreationOptions.None, TaskContinuationOptions.ExecuteSynchronously);
                //Create Child1
                tf.StartNew(() =>
                    {
                        Console.WriteLine("Child1 statement1");
                        Thread.Sleep(5000);
                        Console.WriteLine("Child1 statement2");
                    });
                //Create Child2
                tf.StartNew(() =>
                {
                    Console.WriteLine("Child2 statement1");
                    Thread.Sleep(5000);
                    Console.WriteLine("Child2 statement2");
                });
                Console.WriteLine("Parent Task statement2");
            });
            //Here final task is going to wait for parent task
            var finalTask = parent.ContinueWith(parentTask =>
                {
                    Console.WriteLine("Final statement");
                });
            Console.ReadLine();
        }
image

In this program, we have:
1. One task “parent” is encapsulating two child tasks.
2. Then created a task which is going to execute when the parent task is completed.
3. We cannot control the flow of execution here in the case of child tasks. In the output, you can find that parent task statements are executed first then child’s statements are executed. By the time another statement is executed, final task statement is displayed.

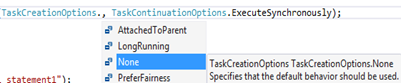
If you want parent to wait till the child tasks to complete, System.Threading provides enum TaskContinuationOptions with value “AttachedToParent”. This will bind the child tasks to the parent task which makes the parent task to wait till the child tasks are completed.
image

Now modify the statement in your program as below:

TaskFactory tf = new TaskFactory(TaskCreationOptions.AttachedToParent, TaskContinuationOptions.ExecuteSynchronously);

After this code change you will observe that parent task is going to wait for the child tasks to complete.

Check the following output:
image

Now you observe that final task waits till parent task is completed execution and parent task is going to wait till child tasks are completed.

Now if you see the output, you will get a question as I got when I learnt the basics “From the output it seems all the statements in the parent task are displayed first and then child task statements were displayed. Then how can you support your statement that parent task is going to wait for child tasks to complete?

Here is my answer for the question:

Because the output displays statements with “Parent Task…” are displayed first and then followed by statements with “Child…” does not mean parent has completed the execution and is not waiting for the child to complete. Here is the confirmation with the change highlighted to support:

/// <summary>
        /// Program to show dependencies between Parent
        /// and child tasks
        /// </summary>
        /// <param name="args"></param>
        static void Main(string[] args)
        {
            //parent task created with Task.Factory.StartNew
            //This task is the outer task which is going to encapsulate
            //inner tasks or child tasks
            var parent = Task.Factory.StartNew(() =>
            {
                Console.WriteLine("Parent Task statement1");
                //Create a TaskFactory. Once you create a TaskFactory instance, you can create as many tasks
                //as needed.
                TaskFactory tf = new TaskFactory(TaskCreationOptions.AttachedToParent, TaskContinuationOptions.ExecuteSynchronously);
                //Create Child1
                tf.StartNew(() =>
                    {
                        Console.WriteLine("Child1 statement1");
                        Thread.Sleep(5000);
                        Console.WriteLine("Child1 statement2");
                    }).ContinueWith((t) =>
                    {
                        Console.WriteLine("Child1 task is completed");
                    }, TaskContinuationOptions.OnlyOnRanToCompletion);
                //Create Child2
                tf.StartNew(() =>
                {
                    Console.WriteLine("Child2 statement1");
                    Thread.Sleep(5000);
                    Console.WriteLine("Child2 statement2");
                }).ContinueWith((t) =>
                {
                    Console.WriteLine("Child2 task is completed");
                }, TaskContinuationOptions.OnlyOnRanToCompletion);
                Console.WriteLine("Parent Task statement2");
            }).ContinueWith((t)=>
                {
                    Console.WriteLine("Parent task is completed");
                }, TaskContinuationOptions.OnlyOnRanToCompletion);
            //Here final task is going to wait for parent task
            var finalTask = parent.ContinueWith(parentTask =>
                {
                    Console.WriteLine("Final statement");
                });
            Console.ReadLine();
        }

Now we have added continue tasks once the task has completed the execution with “TaskContinuationOptions.OnlyOnRanToCompletion”. With this addition of confirmation statements, now check the output that confirms that parent task has completed only after child tasks are completed.
image

Additional methods:
- WaitAll() method can be used to wait for all multiple tasks to finish before continuation.
- WhenAll() method can be used to schedule a continuation method after all Tasks have completed.
- WaitAny() method can be used to wait until one of the Tasks is finished.

Hope you like this article. The programs are coded in C# 4.0. In the next article I will touch the same programs rewritten in C# 5.0 and then we will discuss the new features added in C# 5.0.